A durable and attractive finish is crucial for any guitar, influencing both its aesthetic appeal and its ability to withstand the rigors of playing and environmental factors. Among the various options available, the polyurethane guitar finish stands out for its robust protection and versatility. This article will explore the characteristics, application techniques, and maintenance of polyurethane finishes on guitars, providing a comprehensive guide for luthiers and guitar enthusiasts alike.
Understanding the nuances of a polyurethane guitar finish can significantly enhance the quality and longevity of your instrument. Let’s examine why this finish is so popular and how to make the most of it.
Whether you’re a seasoned professional or a DIY enthusiast, mastering the art of applying a poly finish guitar can elevate your craftsmanship. With the right techniques and knowledge, you can achieve a finish that not only looks stunning but also protects your instrument for years to come.
Exploring Polyurethane: Characteristics and Benefits for Guitars
Polyurethane is a synthetic resin known for its exceptional durability, flexibility, and resistance to chemicals and abrasion. It’s a popular choice for guitar finishes because it forms a tough, protective layer that shields the wood from moisture, scratches, and dents.
Unlike some other finishes, a polyurethane guitar finish is relatively easy to apply, making it accessible to both professional luthiers and hobbyists. The finish’s ability to level out smoothly also contributes to its appeal, resulting in a flawless, glass-like surface.
One of the primary benefits of polyurethane is its moisture resistance, which helps to prevent the wood from warping or cracking due to humidity changes. This is especially important for acoustic guitars, where the wood’s stability directly affects the instrument’s sound quality.
Furthermore, polyurethane finishes are available in various sheens, from high-gloss to matte, allowing for a wide range of aesthetic options. This versatility makes it suitable for different guitar styles and player preferences, ensuring that the finish complements the instrument’s design.
Polyurethane’s chemical resistance is another significant advantage. It can withstand exposure to common household chemicals and cleaning agents that might damage other finishes. This makes it easier to maintain the guitar’s appearance over time.
The impact resistance of polyurethane is also noteworthy. It can absorb shocks and impacts that could otherwise cause dents or cracks in the wood, preserving the guitar’s structural integrity.
Another key characteristic is its ability to be tinted or colored. This allows for a wide range of custom finishes, from vibrant solid colors to subtle transparent hues that enhance the wood grain.
Polyurethane finishes also tend to be more resistant to yellowing over time compared to some other finishes, especially when UV inhibitors are added. This helps to maintain the guitar’s original color and appearance for longer.
Choosing the Right Polyurethane for Your Guitar Project
Selecting the appropriate polyurethane product is essential for achieving the desired results. There are two main types of polyurethane finishes: water-based and oil-based, each with its own set of advantages and disadvantages.
Water-based polyurethanes are favored for their low VOC (volatile organic compound) content, making them a more environmentally friendly option. They also dry faster and have less odor compared to oil-based alternatives, contributing to a safer and more pleasant working environment.
On the other hand, oil-based polyurethanes typically offer greater durability and a warmer, richer tone. They tend to yellow slightly over time, which can enhance the vintage look of some guitars, but this might not be desirable for all projects.
Consider the specific requirements of your guitar and the desired aesthetic when making your choice. For a clear, non-yellowing finish on a light-colored wood, a water-based polyurethane is often the best option, while an oil-based product may be preferred for its enhanced durability and traditional appearance.
When selecting a water-based polyurethane, look for products specifically designed for musical instruments. These formulations often have enhanced clarity and flexibility to optimize the guitar’s tone.
For oil-based polyurethanes, consider the solids content, which affects the thickness and build of the finish. Higher solids content generally results in a more durable and protective coating.
Also, check the product’s compatibility with the wood you’re using. Some woods may react differently to certain types of polyurethane, so it’s always a good idea to test a small area first.
Consider the application method you plan to use. Some polyurethanes are formulated for spraying, while others are better suited for brushing or wiping. Choose a product that is compatible with your chosen method.
Preparing the Wood for a Polyurethane Finish
Proper preparation of the wood surface is crucial for ensuring a smooth and even polyurethane guitar finish. This process involves sanding, cleaning, and sealing the wood to create an ideal base for the finish to adhere to.
Start by sanding the wood with progressively finer grits of sandpaper, typically beginning with 120-grit and working up to 320-grit. This will remove any imperfections, such as scratches or dents, and create a smooth, uniform surface.
| Step | Description | Grit |
|---|---|---|
| 1 | Initial Sanding | 120-grit |
| 2 | Intermediate Sanding | 220-grit |
| 3 | Final Sanding | 320-grit |
| 4 | Sealing (optional) | N/A |
After sanding, thoroughly clean the wood surface to remove any dust or debris. Use a tack cloth or a clean, lint-free cloth dampened with mineral spirits or naphtha to wipe down the surface, ensuring it is completely free of contaminants.
Consider using a sanding sealer to further prepare the wood for the polyurethane finish. A sanding sealer helps to fill the wood pores and create a more uniform surface for the finish to adhere to.
Apply the sanding sealer according to the manufacturer’s instructions and allow it to dry completely. Then, lightly sand the sealer with fine-grit sandpaper (320-grit or higher) to create a smooth, even base.
If you’re using a wood with open pores, such as mahogany or rosewood, multiple coats of sanding sealer may be necessary to achieve a smooth surface. Be sure to sand lightly between each coat.
For figured woods, such as flame maple or quilted maple, careful sanding is essential to avoid sanding through the figure. Use a sanding block and light pressure to preserve the wood’s unique appearance.
Applying Polyurethane: Spraying and Brushing Methods
There are two primary methods for applying a polyurethane guitar finish: spraying and brushing. Each technique has its own set of advantages and considerations, and the best choice depends on your equipment, skill level, and the desired finish quality.
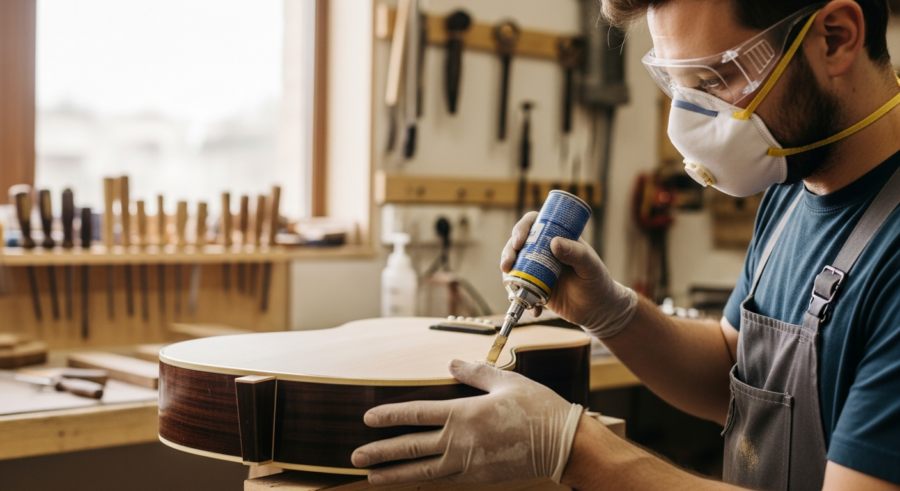
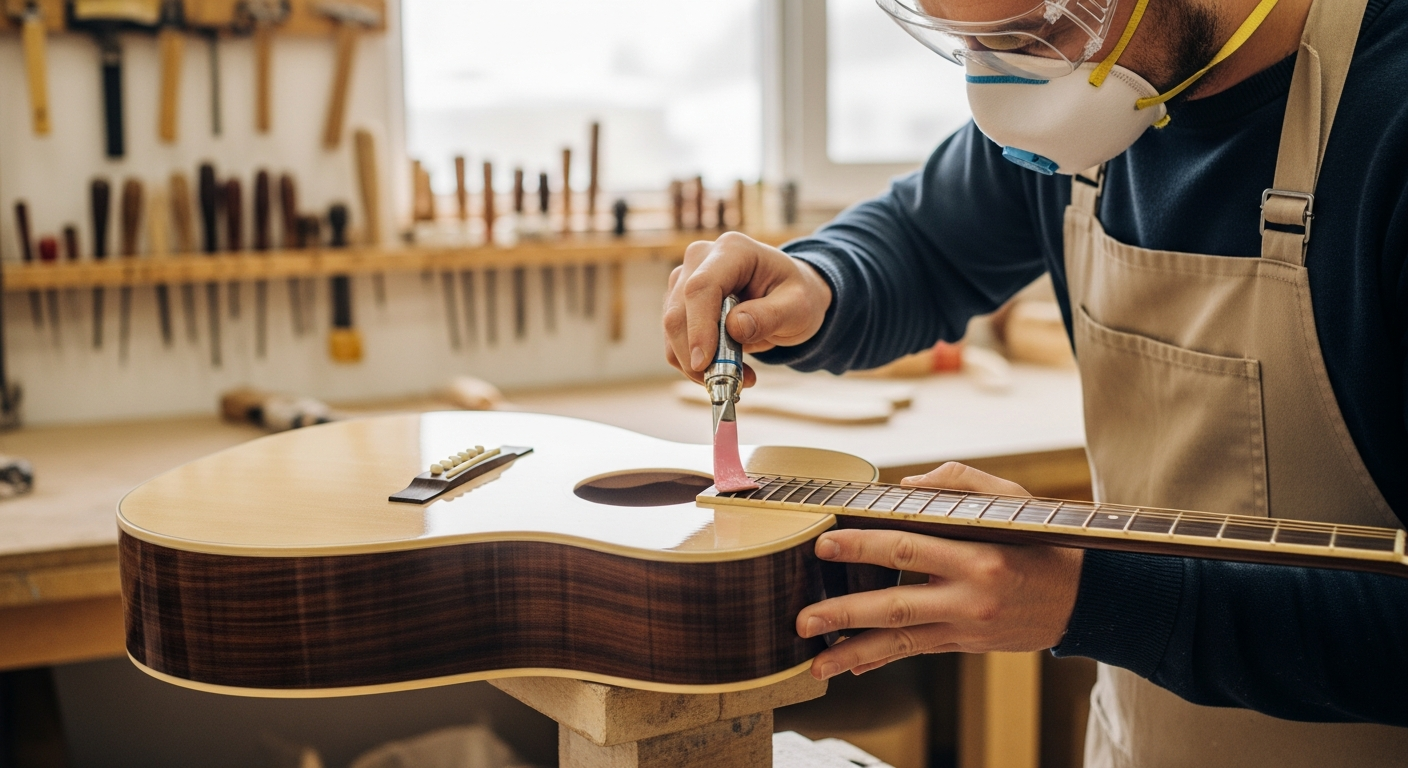
Spraying polyurethane typically results in a smoother, more even finish with fewer brush marks. This method requires the use of a spray gun, which can be either an airless sprayer or an HVLP (high volume, low pressure) system, and proper ventilation is essential due to the airborne particles.
When spraying, apply thin, even coats of polyurethane, overlapping each pass slightly to ensure complete coverage. Allow each coat to dry completely before applying the next, and lightly sand between coats with fine-grit sandpaper (400-grit or higher) to remove any imperfections and promote adhesion.
Brushing polyurethane is a more accessible method for those without spraying equipment, but it requires careful technique to avoid brush marks. Use a high-quality brush designed for applying polyurethane, and apply thin, even coats, working in the direction of the wood grain.
When spraying, maintain a consistent distance and angle from the guitar body to ensure even coverage. Overlapping each pass by about 50% is a good rule of thumb.
If you’re brushing, avoid applying too much pressure, which can cause brush marks. Use long, smooth strokes and try to maintain a wet edge to prevent the finish from drying unevenly.
For both spraying and brushing, it’s important to work in a clean, dust-free environment. Dust particles can settle on the finish and create imperfections.
Consider using a tack cloth to wipe down the guitar body before each coat of polyurethane. This will help to remove any dust or debris that may have settled on the surface.
Curing and Leveling Polyurethane Finishes
Proper curing is essential for achieving the full durability and clarity of a polyurethane finish. This process involves allowing the finish to dry and harden completely, which can take several days or even weeks, depending on the specific product and environmental conditions.
During the curing process, protect the guitar from dust and other contaminants to prevent imperfections from settling on the surface. Maintain a consistent temperature and humidity level in the curing environment to ensure even drying and hardening.
Once the polyurethane has fully cured, you may need to level the finish to remove any imperfections, such as orange peel or dust nibs. This is typically done using wet sanding, a technique that involves sanding the finish with fine-grit sandpaper (600-grit or higher) lubricated with water and a drop of dish soap.
After wet sanding, use a polishing compound and a buffing wheel to restore the finish’s gloss and clarity. Work in small sections, applying gentle pressure and overlapping each pass to achieve a uniform shine.
When wet sanding, use a sanding block to ensure even pressure and avoid creating flat spots. Keep the sandpaper and the surface of the finish well-lubricated with water.
Start with a coarser grit of sandpaper (e.g., 600-grit) to remove any significant imperfections, and then gradually move to finer grits (e.g., 800-grit, 1000-grit, 1200-grit) to refine the surface.
After wet sanding, thoroughly clean the guitar body to remove any sanding residue. Use a clean, damp cloth and then dry it with a clean, lint-free cloth.
When polishing, use a polishing compound specifically designed for polyurethane finishes. Follow the manufacturer’s instructions carefully and avoid overheating the finish.
Maintaining a Polyurethane-Coated Guitar
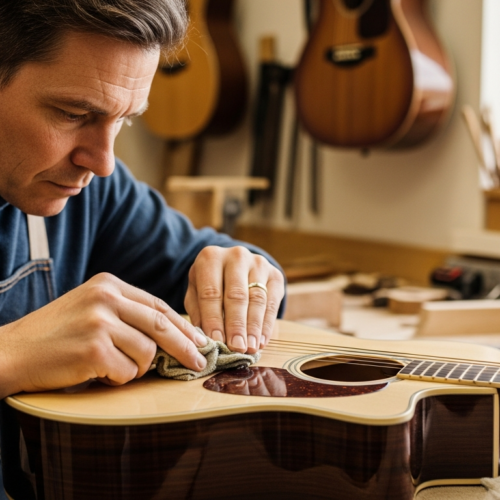
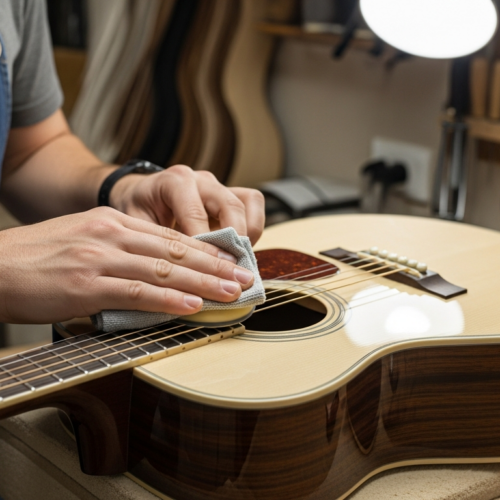
Maintaining a polyurethane-coated guitar is relatively straightforward, thanks to the finish’s durability and resistance to wear. Regular cleaning and proper storage can help to keep your instrument looking its best for years to come.
To clean your guitar, use a soft, lint-free cloth dampened with a guitar polish or a mild soap and water solution. Gently wipe down the finish to remove any fingerprints, dust, or grime, and then dry it with a clean cloth.
- Regularly wipe down the guitar after playing
- Use a guitar-specific polish
- Store the guitar in a case when not in use
- Avoid extreme temperature and humidity changes
- Consider professional maintenance for deep cleaning
When not in use, store your guitar in a case to protect it from dust, scratches, and environmental factors. Avoid exposing the instrument to extreme temperatures or humidity levels, as these can damage the finish and the wood.
Avoid using harsh chemicals or abrasive cleaners on the polyurethane finish. These can damage the finish and dull its shine.
If you notice any scratches or swirl marks in the finish, use a guitar polish specifically designed to remove these imperfections. Apply the polish according to the manufacturer’s instructions and buff the finish with a clean, soft cloth.
Consider using a guitar humidifier to maintain a consistent humidity level in the guitar’s case. This will help to prevent the wood from drying out or warping.
Regularly inspect the guitar’s hardware, such as the tuning pegs and bridge, and tighten any loose screws. This will help to prevent buzzing or other problems.
Troubleshooting Common Polyurethane Finish Issues
Even with careful application, you might encounter some common issues when working with a polyurethane guitar finish. Understanding these problems and how to address them can save you time and frustration.
One frequent issue is the appearance of bubbles in the finish, which can be caused by applying the polyurethane too thickly or by shaking the can too vigorously before application. To prevent bubbles, apply thin, even coats and allow each coat to dry thoroughly before applying the next.
Another common problem is orange peel, a textured surface that resembles the skin of an orange. This can be caused by spraying the polyurethane too far from the surface or by using a product that is too thick. Adjust your spraying technique or thin the polyurethane with the appropriate solvent to resolve this issue.
Brush marks can also be a concern when applying polyurethane with a brush. To minimize brush marks, use a high-quality brush designed for polyurethane and apply thin, even coats, working in the direction of the wood grain.
If you experience runs or drips in the finish, allow the polyurethane to dry completely and then sand them down with fine-grit sandpaper. Apply another thin coat of polyurethane to blend the repaired area with the surrounding finish.
If the polyurethane finish is too glossy, you can dull it down by using a fine-grit abrasive pad or steel wool. Be careful not to scratch the finish too deeply.
If the polyurethane finish is too matte, you can polish it with a polishing compound and a buffing wheel to restore its gloss.
If you experience blushing, a cloudy or hazy appearance in the finish, this is typically caused by moisture trapped in the polyurethane. Use a blush eraser or a heat gun to remove the moisture and restore the clarity of the finish.
Alternatives to Polyurethane: Other Guitar Finish Types
While polyurethane is a popular choice for guitar finishes, it’s not the only option available. Other types of finishes, such as nitrocellulose lacquer, varnish, and shellac, each offer their own unique characteristics and benefits.
Nitrocellulose lacquer is a traditional finish that is prized for its thinness and ability to allow the wood to breathe. It’s often used on vintage guitars and is known for its ability to age gracefully, developing a desirable patina over time.
Varnish is another durable option that offers excellent protection and a warm, amber tone. It’s often used on acoustic guitars and is known for its ability to enhance the wood’s natural beauty.
Shellac is a natural resin that provides a thin, flexible finish. It’s often used on classical guitars and is known for its ability to enhance the instrument’s resonance.
Acrylic lacquer is another option that offers good clarity and durability. It’s often used on modern guitars and is known for its resistance to yellowing.
Polyester finishes are extremely durable and resistant to chemicals and abrasion. They are often used on mass-produced guitars and are known for their high-gloss appearance.
Oil finishes, such as tung oil or linseed oil, provide a natural, hand-rubbed look and feel. They are often used on custom guitars and are known for their ability to enhance the wood’s natural grain.
Each type of finish has its own set of advantages and disadvantages, so it’s important to choose the one that best suits your needs and preferences. Consider the desired aesthetic, durability, and tonal characteristics when making your decision.
Polyurethane vs. Nitrocellulose: A Detailed Comparison
The debate between polyurethane and nitrocellulose as guitar finish types is ongoing, with each having proponents who value their distinct characteristics. Let’s examine a detailed comparison to clarify the key differences.
Polyurethane is generally more durable and resistant to scratches, dents, and chemical damage than nitrocellulose. This makes it a practical choice for guitars that will be heavily used or exposed to harsh environments.
Nitrocellulose, on the other hand, is thinner and more flexible, allowing the wood to vibrate more freely. Many believe this contributes to a more resonant and tonally rich sound, especially in acoustic guitars.
Application also differs significantly: polyurethane is easier to apply evenly and requires fewer coats, while nitrocellulose requires more skill and patience. Nitrocellulose also requires more stringent safety precautions due to its higher VOC content.
Polyurethane finishes tend to be thicker than nitrocellulose, which can dampen the wood’s natural resonance. This is a major consideration for some guitar builders and players.
Nitrocellulose finishes age and wear more gracefully than polyurethane, developing a desirable patina over time. This is a sought-after characteristic for vintage-style guitars.
Repairing a nitrocellulose finish is generally easier than repairing a polyurethane finish. Nitrocellulose blends more easily with existing finish, while polyurethane repairs can be more noticeable.
The cost of materials and equipment for applying nitrocellulose is typically higher than for polyurethane, due to the specialized equipment and safety precautions required.
Achieving a Professional-Quality Polyurethane Guitar Finish: Tips and Tricks
Achieving a professional-quality polyurethane guitar finish requires attention to detail and a commitment to best practices. Here are some tips and tricks to help you achieve a flawless result.
Invest in high-quality equipment, including a good spray gun or brush, and use only premium-grade polyurethane products. This will ensure that you have the tools and materials necessary to achieve a smooth, even finish.
Practice your application technique on scrap wood before working on your guitar. This will allow you to refine your skills and identify any potential issues before they affect your final product.
Take your time and don’t rush the process. Applying thin, even coats of polyurethane and allowing each coat to dry completely is essential for achieving a durable and attractive finish.
Use a tack cloth to wipe down the guitar body before each coat of polyurethane. This will help to remove any dust or debris that may have settled on the surface.
Maintain a consistent temperature and humidity level in your work environment. This will help to ensure that the polyurethane dries and cures properly.
Consider using a respirator mask and eye protection when working with polyurethane. This will help to protect you from harmful vapors and particles.
Experiment with different application techniques to find the one that works best for you. Some people prefer spraying, while others prefer brushing or wiping.
Conclusion
The polyurethane guitar finish offers a blend of durability, aesthetic versatility, and ease of application that makes it a favorite among luthiers and guitar enthusiasts. Understanding its characteristics, application techniques, and maintenance requirements is key to achieving a stunning and long-lasting finish.
Whether you choose a water-based or oil-based polyurethane, proper preparation, careful application, and diligent maintenance will ensure that your guitar looks and sounds its best for years to come. With the knowledge and techniques outlined in this guide, you can confidently tackle your next guitar finishing project and achieve professional-quality results.
Remember to always prioritize safety when working with finishing products. Proper ventilation and personal protective equipment are essential.
By mastering the art of applying a polyurethane finish, you can significantly enhance the value and enjoyment of your guitars. A well-applied finish not only protects the instrument but also enhances its beauty and tonal qualities.