The quest for the perfect guitar tone often leads luthiers down a rabbit hole of tonewoods, bracing patterns, and hardware choices. However, one aspect that’s sometimes overlooked is the finish applied to the instrument. A well-executed finish not only protects the wood but can also enhance its tonal properties.
Among the various options available, shellac stands out as a classic and highly regarded choice for achieving a beautiful and resonant shellac guitar finish. In this comprehensive guide, we’ll explore the ins and outs of using shellac, focusing on its unique qualities and application techniques for luthiers seeking the best possible sound from their creations.
From understanding what shellac is and why it’s favored by many, to mastering the art of French polish guitar application, we’ll cover all the essential aspects. Whether you’re a seasoned luthier or just starting out, this guide will provide you with the knowledge and skills to achieve a stunning and sonically pleasing shellac finish.
What is Shellac and Why Use It on a Guitar?
Shellac is a resin secreted by the lac bug, native to forests in India and Thailand. This natural substance has been used for centuries as a wood finish, prized for its clarity, warmth, and ability to enhance the natural beauty of wood.
Unlike modern synthetic finishes like polyurethane or polyester, shellac offers a unique combination of properties that make it particularly well-suited for use on musical instruments. Its relatively soft and flexible nature allows the wood to vibrate more freely, resulting in a more open and responsive tone.
One of the key advantages of shellac is its breathability. This means it allows moisture to pass through the finish, preventing it from becoming trapped within the wood and causing dimensional changes or even cracking.
This is especially important for guitars, which are constantly exposed to varying humidity levels. Another reason luthiers favor shellac is its ease of repair. Dents, scratches, or other imperfections can be easily spot-repaired without the need to refinish the entire instrument.
Shellac’s natural origins also appeal to those seeking environmentally friendly finishing options. It is a renewable resource, unlike many synthetic alternatives derived from petroleum.

Furthermore, shellac imparts a certain depth and character to the wood that is difficult to replicate with other finishes. It enhances the grain and figure of the wood, creating a visually stunning instrument.
The application process itself, especially French polishing, is a craft steeped in tradition and skill. Mastering this technique is a rewarding endeavor for any luthier aiming for the highest level of artistry.
Many vintage guitars feature shellac finishes, contributing to their revered tonal qualities. Replicating this finish on modern instruments can capture some of that vintage magic.
Beyond its tonal and aesthetic qualities, shellac is also relatively easy to remove or strip if necessary. This makes it a good choice for luthiers who value reversibility and the ability to experiment with different finishes.
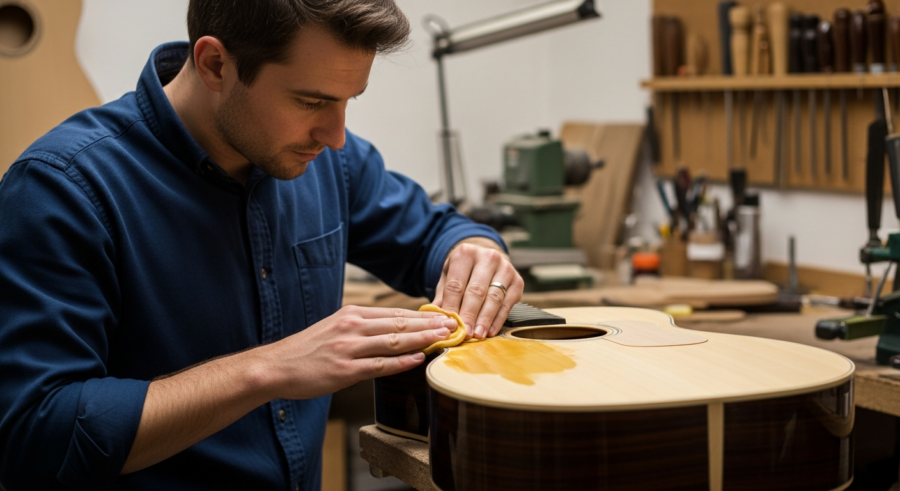
Preparing the Guitar Surface for Shellac
Before applying any finish, proper surface preparation is paramount. For shellac, this means ensuring the wood is smooth, clean, and free of any contaminants that could interfere with adhesion or the final appearance.
Start by sanding the guitar body with progressively finer grits of sandpaper, typically starting with 120-grit and working up to 320 or even 400-grit. Take your time and pay attention to detail, as any imperfections at this stage will be magnified by the finish.
After sanding, remove all dust and debris with a vacuum cleaner and a tack cloth. It’s important to use a clean tack cloth to avoid transferring any oils or residues back onto the wood.
Next, consider pore filling, especially if you’re working with open-pored woods like mahogany or rosewood. Pore fillers are designed to fill the tiny pores in the wood’s surface, creating a smooth and level base for the finish.
The sanding process should be meticulous, ensuring that all scratches and imperfections are removed. Using a sanding block can help maintain a flat and even surface.
When vacuuming, pay close attention to corners and edges where dust can accumulate. A small brush attachment can be helpful for reaching these areas.
Choosing the right pore filler is crucial for achieving a smooth finish on open-pored woods. Experiment with different types of fillers to find one that matches the color and grain of the wood.
Apply the pore filler according to the manufacturer’s instructions, typically by rubbing it into the wood’s surface and then wiping away the excess. Allow the pore filler to dry completely before proceeding to the next step.
After the pore filler has dried, lightly sand the surface again with fine-grit sandpaper to remove any remaining residue and ensure a perfectly smooth base for the shellac finish. This step is crucial for achieving a flawless final result.
Mixing Shellac for the Perfect Finish
Shellac is typically sold in dry flake form and must be mixed with denatured alcohol to create a liquid finish. The ratio of shellac to alcohol is referred to as the “cut,” and it’s usually expressed in pounds of shellac per gallon of alcohol.
For guitar finishing, a 2-pound cut is a good starting point. This means dissolving 2 pounds of shellac flakes in 1 gallon of denatured alcohol.
| Shellac Cut | Shellac (lbs per gallon) | Typical Use |
|---|---|---|
| 1-pound | 1 lb | Sealer, Wash Coat |
| 2-pound | 2 lbs | General Purpose Finish |
| 3-pound | 3 lbs | Furniture Finish |
| 4-pound | 4 lbs | Heavy-Duty Finish |
To mix shellac, start by measuring out the desired amount of shellac flakes and pouring them into a clean glass jar. Then, add the appropriate amount of denatured alcohol, ensuring the flakes are completely submerged.
Seal the jar tightly and shake it vigorously for several minutes to help dissolve the shellac. Let the mixture sit for at least 24 hours, shaking it occasionally, until the shellac is completely dissolved and the solution is clear.
Using a high-quality denatured alcohol is essential for a clear and durable finish. Avoid using alcohols that contain additives or impurities.
The type of shellac flakes you use can also affect the final color and appearance of the finish. Blonde shellac is the lightest in color and is a good choice for preserving the natural color of the wood.
Amber shellac has a warmer, more golden tone and can add depth and richness to the wood’s appearance. Garnet shellac is the darkest in color and can be used to create a vintage or antique look.
After mixing, it’s a good idea to filter the shellac through a fine-mesh strainer or cheesecloth to remove any undissolved flakes or impurities. This will help ensure a smooth and flawless finish.
Proper storage of shellac is also important. Keep it in a tightly sealed glass jar in a cool, dark place to prevent it from drying out or deteriorating. Shellac can have a limited shelf life, so it’s best to use it within a year of mixing.
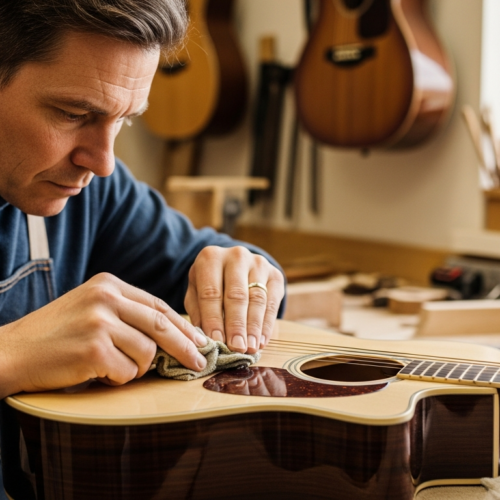
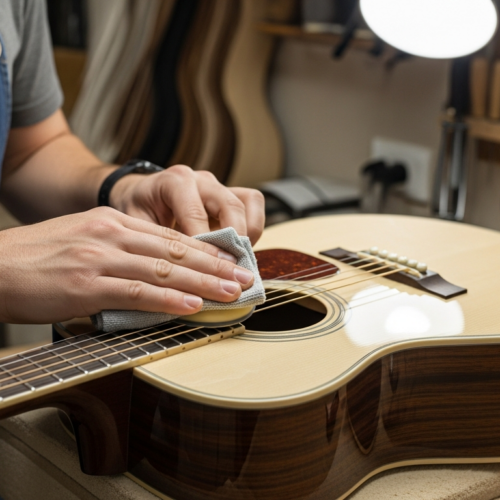
Applying Shellac: The French Polish Technique
The French polish guitar technique is the traditional method for applying shellac, and it’s known for producing a thin, glossy, and highly refined finish. This process involves using a “rubber,” which is a pad made of cotton or linen wrapped around a core of absorbent material like wool or cotton batting.
To begin, dampen the rubber with a small amount of the shellac mixture. Then, add a drop or two of mineral oil to the face of the rubber to act as a lubricant.
Using a circular or figure-eight motion, apply the shellac to the guitar surface, working in small sections at a time. The key is to use very light pressure and to keep the rubber moving constantly to avoid leaving streaks or swirl marks.
After each pass, add a small amount of shellac and mineral oil to the rubber as needed. The goal is to build up thin layers of shellac gradually, allowing each layer to dry completely before applying the next.
The French polish technique requires patience and practice to master. It’s a slow and deliberate process that can take several days or even weeks to complete.
The amount of mineral oil you use is crucial. Too much oil can cause the finish to become cloudy or hazy, while too little oil can cause the rubber to stick to the surface.
The pressure you apply with the rubber should be very light, almost like you’re just dusting the surface. Applying too much pressure can cause the shellac to build up unevenly and create streaks or swirl marks.
Between coats, allow the shellac to dry completely. This can take several hours or even overnight, depending on the humidity and temperature. Use a soft, lint-free cloth to remove any excess oil or residue from the surface before applying the next coat.
The final step in the French polish process is “spiriting off,” which involves using a rubber dampened with only denatured alcohol to remove any remaining oil and create a high-gloss finish. This step requires a very light touch and a lot of patience.
Considerations for Tonewoods
The choice of tonewood significantly influences the final sound of a guitar. Different species have unique densities, stiffnesses, and resonant frequencies, all contributing to the instrument’s overall tonal character.
For example, spruce is a common choice for soundboards due to its high stiffness-to-weight ratio, which allows it to vibrate freely and produce a clear, bright tone. Mahogany, on the other hand, is known for its warmth and sustain, making it a popular choice for backs and sides.
When selecting a finish, it’s important to consider how it will interact with the tonewood. A finish that’s too thick or inflexible can dampen the wood’s natural vibrations, resulting in a dull or lifeless tone.
Shellac is an excellent choice for tonewoods because it’s relatively thin and flexible, allowing the wood to vibrate more freely. It also has a low refractive index, meaning it doesn’t significantly alter the wood’s natural color or appearance.
Rosewood, often used for fretboards and bridges, benefits from shellac’s ability to enhance its natural oils. This can lead to a richer, more resonant sound.
Maple, known for its bright and articulate tone, can be further enhanced by shellac’s clarity. It allows the wood’s natural brilliance to shine through.
Cedar, a softer wood often used for classical guitar tops, requires a finish that won’t stifle its delicate vibrations. Shellac is an ideal choice due to its flexibility.
The thickness of the shellac finish should be carefully controlled to avoid dampening the wood’s natural resonance. Multiple thin coats are always preferable to a single thick coat.
Ultimately, the best finish for a particular tonewood depends on the desired tonal characteristics of the instrument. Experimentation and careful listening are key to finding the perfect combination.
Troubleshooting Common Shellac Problems
While shellac is a relatively forgiving finish, it’s not without its challenges. One common issue is “orange peel,” which is a textured surface that resembles the skin of an orange.
This can be caused by applying the shellac too thickly, using too much mineral oil, or not allowing each layer to dry completely before applying the next. Another potential problem is “blushing,” which is a cloudy or hazy appearance that can occur when shellac is applied in humid conditions.
- Too much pressure on the rubber
- Inconsistent application technique
- Contaminated shellac mixture
- Inadequate drying time between coats
- Improper surface preparation
To avoid these problems, always work in a well-ventilated area with moderate temperature and humidity. If blushing occurs, try adding a small amount of retarder to the shellac mixture to slow down the drying time.
“Alligatoring,” or cracking of the finish, can occur if the shellac is applied over an incompatible finish. Always ensure the surface is properly prepared and free of any previous finishes.
Runs and sags can happen when spraying shellac if the mixture is too thin or the spray gun is not properly adjusted. Practice your spraying technique on a scrap piece of wood before applying the finish to the guitar.
Bubbles in the finish can be caused by air trapped in the wood’s pores. Pore filling is essential for preventing this issue, especially with open-pored woods.
If you notice any imperfections in the finish, don’t panic. Shellac is relatively easy to repair. Lightly sand the affected area and reapply the finish using the French polish technique.
Consistent practice and attention to detail are the best ways to avoid common shellac problems. Take your time and learn from your mistakes, and you’ll eventually master the art of applying a flawless shellac finish.
Caring for a Shellac-Finished Guitar
Shellac is a relatively soft finish, so it requires some special care to keep it looking its best. Avoid exposing your shellac-finished guitar to extreme temperatures or humidity, as this can cause the finish to crack or blister.
When cleaning your guitar, use a soft, lint-free cloth and avoid using harsh chemicals or abrasive cleaners. A slightly damp cloth is usually sufficient to remove fingerprints and smudges.
For more stubborn dirt or grime, you can use a specialized guitar polish that’s designed for use on shellac finishes. Be sure to follow the manufacturer’s instructions carefully.
If your shellac finish becomes scratched or damaged, it can usually be spot-repaired using the French polish technique. This involves carefully applying thin layers of shellac to the affected area until the damage is no longer visible.
Avoid using guitar stands or cases that have rubber or foam padding that can react with the shellac finish. Use stands and cases with cloth or velvet lining.
When traveling with your guitar, be sure to protect it from extreme temperatures and humidity. A hard-shell case is essential for providing adequate protection.
Regularly inspect your guitar’s finish for any signs of damage. Addressing small scratches or imperfections early can prevent them from becoming larger problems.
Consider using a humidifier in your guitar room to maintain a consistent humidity level. This will help prevent the wood from drying out or swelling, which can damage the finish.
With proper care and maintenance, a shellac finish can last for many years and continue to enhance the beauty and tone of your guitar. Treat it with respect, and it will reward you with a lifetime of musical enjoyment.
Alternative Shellac Application Methods
While French polishing is the traditional and most respected method for applying shellac, it’s not the only option. Some luthiers prefer to use spray equipment to apply shellac, which can be faster and more efficient, especially for larger instruments.
When spraying shellac, it’s important to use a high-quality spray gun and to thin the shellac to the appropriate viscosity. Multiple thin coats are better than one thick coat, as this will help to avoid runs and sags.
Another alternative is to apply shellac with a brush. This method can be useful for small areas or for applying a wash coat to seal the wood before French polishing.
When brushing shellac, use a high-quality brush and apply the finish in smooth, even strokes. Be sure to avoid leaving brush marks or drips, as these will be visible in the final finish.
When spraying, ensure proper ventilation and wear a respirator to protect yourself from the fumes. Shellac fumes can be harmful if inhaled.
For brushing, a natural bristle brush is often preferred for its ability to lay down the finish smoothly. Clean the brush thoroughly after each use with denatured alcohol.
A “wash coat” is a very thin coat of shellac used to seal the wood and provide a base for subsequent coats. This can help prevent the finish from soaking into the wood unevenly.
Regardless of the application method, it’s important to practice on scrap wood before applying the finish to the guitar. This will help you get a feel for the technique and avoid making mistakes on the instrument.
Each application method has its own advantages and disadvantages. Experiment with different techniques to find the one that works best for you and your equipment.
Shellac vs. Other Finishes
Shellac is just one of many finish options available to luthiers. Other popular choices include lacquer, varnish, polyurethane, and polyester. Each of these finishes has its own unique set of properties, advantages, and disadvantages.
Lacquer is a popular choice for guitars because it’s relatively easy to apply and can be buffed to a high gloss. However, lacquer is less flexible than shellac and can be more prone to cracking or chipping.
Varnish is a durable and water-resistant finish that’s often used on furniture and other wooden items. However, varnish can be more difficult to apply than shellac or lacquer, and it may not be as flexible or resonant.
Polyurethane and polyester are synthetic finishes that are known for their durability and resistance to chemicals and abrasion. However, these finishes are very hard and inflexible, which can dampen the wood’s natural vibrations and negatively impact the tone of the instrument.
Nitrocellulose lacquer, a common finish on vintage guitars, is known for its ability to allow the wood to breathe and age gracefully. However, it’s also highly flammable and requires specialized equipment to apply.
Water-based finishes are becoming increasingly popular due to their low VOC content and ease of cleanup. However, they may not be as durable or water-resistant as solvent-based finishes.
Oil finishes, such as tung oil or linseed oil, penetrate the wood and provide a natural, matte finish. They’re easy to apply and repair, but they offer less protection than other types of finishes.
Epoxy finishes are extremely durable and chemical-resistant, but they’re also very hard and inflexible. They’re not typically used on guitars due to their negative impact on tone.
The choice of finish ultimately depends on the desired aesthetic, tonal characteristics, and level of protection. Consider the pros and cons of each option before making a decision.
Conclusion
Shellac remains a favored choice among luthiers for its ability to enhance the beauty and tone of acoustic instruments. Its unique properties, including breathability, flexibility, and ease of repair, make it an ideal finish for guitars that are meant to be played and enjoyed for years to come.
By mastering the art of shellac application, particularly the French polish guitar technique, you can achieve a stunning and sonically pleasing finish that will elevate your instruments to a new level of quality and craftsmanship. With careful preparation, precise mixing, and patient application, a shellac guitar finish will bring out the best in every tonewood.
The dedication required to learn and perfect the art of shellac finishing is a testament to the luthier’s commitment to excellence. It is a skill that separates the ordinary from the extraordinary.
Embrace the challenges and rewards of working with shellac, and you’ll discover a world of tonal possibilities and aesthetic beauty. Your guitars will not only sound amazing but will also be works of art.
So, embark on your shellac finishing journey with confidence and passion. The results will speak for themselves, resonating with both players and listeners alike.